들어가며..
Stream객체를 사용하여 간단한 타이머를 만들어본다. 타이머 기능 중 stop, resume, restart 이벤트를 제어하기 위해 StreamSubscription객체를 사용한다.
개발환경
- 윈도우 / Flutter 2.10 / Android emulator / Visual Studio Code
📃 main.dart
모든 내용은 설명에 편리를 위해 main.dart에 코딩한다.
import 'dart:async';

import 'package:flutter/material.dart';

void main() {
  runApp(const MyApp());
}

class MyApp extends StatelessWidget {
  const MyApp({Key? key}) : super(key: key);

  @override
  Widget build(BuildContext context) {
    return MaterialApp(
      home: _Timer(),
    );
  }
}

class _Timer extends StatefulWidget {
  const _Timer({Key? key}) : super(key: key);

  @override
  State<_Timer> createState() => __TimerState();
}

class Ticker {
  const Ticker();
  Stream<int> tick({required int ticks}) {
    return Stream.periodic(Duration(seconds: 1), (x) => ticks - x).take(ticks);
  }
}

...<중략>...Ticker클래스에Tick함수를 통해 Stream 데이터를 받는다.periodic함수는 주어진Duration에 따라 반복적으로 데이터를 출력(emit)한다.
📃 Timer builder ( main.dart )
...<중략>...
class __TimerState extends State<_Timer> {
late StreamSubscription<int> subscription;
int? _currentTick;
bool _isPaused = false;
@override
initState() {
super.initState();
_start(30);
}
void _start(int duration) {
subscription = Ticker().tick(ticks: duration).listen((value) {
setState(() {
_isPaused = false;
_currentTick = value;
});
});
}
void _resume() {
setState(() {
_isPaused = false;
});
subscription.resume();
}
void _pause() {
setState(() {
_isPaused = true;
});
subscription.pause();
}
@override
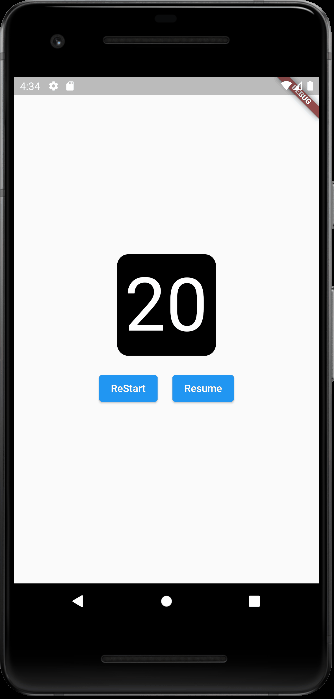
Widget build(BuildContext context) {
return Scaffold(
body: Column(
mainAxisAlignment: MainAxisAlignment.center,
children: [
Container(
padding: const EdgeInsets.all(10),
decoration: const BoxDecoration(
color: Colors.black,
borderRadius: BorderRadius.all(Radius.circular(15))),
child: Text(
_currentTick == null ? '' : _currentTick.toString(),
style: TextStyle(fontSize: 100, color: Colors.white),
),
),
const SizedBox(
height: 20,
),
Row(
mainAxisAlignment: MainAxisAlignment.center,
children: [
ElevatedButton(
onPressed: () {
subscription.cancel();
_start(30);
},
child: const Text('ReStart')),
const SizedBox(
width: 20,
),
ElevatedButton(
onPressed: () {
_isPaused ? _resume() : _pause();
},
child: Text(_isPaused ? 'Resume' : 'Stop'))
],
)
],
),
);
}
}- Stream을 제어할
late StreamSubscription<int>객체 변수를 선언한다. StreamSubscription은Stream객체를 제어 함수로cancel,pause,resume을 제공한다.- 각 제어함수의 이벤트 함수를 정의하여 호출한다.
마치며..
Stream 데이터를 제어하기 위해 StreamSubscription을 사용하는 예를 간단한 타이머 예제를 통해 살펴보았다. 다음은 Bloc패턴을 사용하여 시/분/초 타이머를 만들어보고 이벤트 제어하는 방식이 어떻게 다른지 다뤄본다.
반응형
'Mobile Programming' 카테고리의 다른 글
| Flutter/Dart - 문제 해결. Error: XMLHttpRequest error. (1) | 2022.09.06 |
|---|---|
| 문제해결: Bad UTF-8 encoding (U+FFFD; REPLACEMENT CHARACTER) found while decoding string: (0) | 2022.05.30 |
| Flutter - FutureBuilder 사용법 + API 서버 http 연동 (0) | 2022.03.18 |
| Flutter(Dart) - http 패키지 사용법 및 유닛테스트 (0) | 2022.03.18 |
| Flutter(Dart) - Model 객체 Json 매핑 쉽게 하기(@JsonSerializable) (0) | 2022.03.17 |